192.168.0.2 is the default login IP address for some routers and is reserved for modems or wireless routers, including brands such as Belkin, Sanyo, Comtrend, Actiontec, and Luxul. 192.168.0.2 is also the default gateway of these routers. Your network data is forwarded through this address. So, this IP address can be used to log in to and configure the router, as well as to access a network access point to examine network data.
Setting up your router can make your network run more smoothly. If you want to set a login password for your router or modify your Wi-Fi network, you need to log in to your router using 192.168.0.2.
How to login to 192.168.0.2?
To log in to 192.168.0.2, you need to power up your router and connect it to your computer or phone. When you use your computer, you can connect via a network cable or WiFi; when you use your phone, you can connect via WiFi. Of course, this step assumes that your router has WiFi enabled.
Follow the steps below to log in to your router:
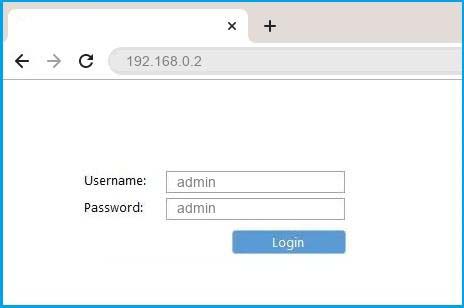
- Open a web browser on your computer, either Google Chrome, Firefox, or Edge is OK. It’s the same operation if you are using a mobile phone.
- In the address bar, type http://192.168.0.2, then hit Enter.
- A login page will appear asking you to enter the router login username and password.

- You need to enter your router’s default login username and password if they have not been modified before.
- Usually, a router’s login username and password are printed on a sticker that is on the router’s back or bottom.
- Please refer to the list below for the default passwords for 192.168.0.2.
- If the login credentials are correct, you will be logged in to the router’s admin interface.
Unable to access 192.168.0.2?
Different routers use different login addresses; check the sticker on the back of the router to see if 192.168.0.2 is the default address. If you enter the incorrect one, you will be unable to access the router’s admin interface.
IF you still can’t log in to 192.168.0.2, here are some possible reasons:
- You’ve modified it to another IP address, such as 192.168.0.1 or 192.168.1.1. To confirm your network gateway address, use the ping command ‘ipconfig‘, or read how to find router IP address here.
- Check whether the connection between your router and computer is correct. The network cable from the ISP should be plugged into the router’s WAN interface, and the network cable from the router to the laptop should be plugged into the router’s LAN interface.
- Don’t enter the IP address in the search box of your browser, the search box will take you to the search engine’s search results, not the router’s login pages.
How to change WiFi SSID and password?
There are many things you can do after logging into your router; for example, you can change its default Wi-Fi network name (SSID) and password. Because this information is printed on the router’s sticker, it can be easily leaked. For the safety of your network, when you buy a new WiFi router, it is best to change both the WiFi SSID and password that the router is pre-configured with.
Changing the network name and password is easy; here are the detailed steps to do it.
Change the WiFi SSID(WiFi network name):
- Log in to your router using the method described above. You will be logged into the router’s admin pages.
- In the menu, look for the Wireless or WiFi section.
- In the Wireless section, find the Wi-Fi Network Name (SSID) field.
- Enter your new WiFi network name in the field.
- Then click Save to apply changes.
- Please wait for the router to reboot, or reboot it manually. After rebooting, the WiFi SSID will be changed.
Change the WiFi password:
- Log in to your router at 192.168.0.2 using the method described above.
- Once logged in, find the Wireless section in the menu.
- Find the WiFi encryption method section and choose the encryption protocol. We strongly recommend that you select WPA2, which is more secure.
- Then enter your new WiFi network password in the related field.
- Then click Save to apply changes.
- After that, your new password is in effect, and you can connect to your Wi-Fi using it.